
Bitbucket App Password Deprecated: Set Up SSH Key to Fix Git Pull and Git Push
Learn how to set up an SSH key for Bitbucket to fix git pull and git push errors caused by deprecated App Passwords. Includes Mac, Windows, remote SSH, and troubleshooting steps.
If you are using Bitbucket over HTTPS, one day you may run:
git pullor:
git push origin mainand suddenly get this error:
remote: App passwords are deprecated and must be replaced with API tokens.
fatal: unable to access 'https://bitbucket.org/anhtran/atdevblog.git/': The requested URL returned error: 410
Or you may see a shorter error:
fatal: Authentication failed
The common reason is that your project is still using an old Bitbucket App Password, or your machine has an old HTTPS credential saved in the credential cache.
A quick solution is to switch to a Bitbucket API Token. However, if you want a cleaner and more stable setup for your personal development machine, especially if you are used to pushing and pulling code often, using an SSH Key is usually a very good option.
This guide explains how to set up an SSH key for Bitbucket on a MacBook and Windows.
1. When should you use SSH Key instead of HTTPS or API Token?
You should use SSH Key if:
You often push and pull code from your personal machine.
You do not want Git to ask for a password or API Token every time.
You do not want to put a token directly inside the Git remote URL.
You want to avoid Bitbucket App Password deprecated errors when using HTTPS.
You want a clean and stable Git setup that depends less on credential cache.
Old HTTPS remote example:
https://bitbucket.org/anhtran/atdevblog.gitAfter switching to SSH, the remote becomes:
git@bitbucket.org:anhtran/atdevblog.gitFrom that point, Git authenticates using your SSH key instead of asking for a password or API Token.
2. Repository example used in this article
In this article, the example repository is:
anhtran/atdevblog.gitHTTPS remote:
https://bitbucket.org/anhtran/atdevblog.gitSSH remote:
git@bitbucket.org:anhtran/atdevblog.gitYou only need to replace anhtran/atdevblog.git with your real workspace and repository name.
3. Set up SSH Key on MacBook
Step 1: Open Terminal
On MacBook, open:
Terminal
You can run the SSH key creation command from any folder.
The reason is that the path:
~/.ssh/...always points to the .ssh folder inside the current user’s Home directory.
For example:
~/.ssh/bitbucket_atdevblogmeans the key file will be created at:
/Users/<your-mac-user>/.ssh/bitbucket_atdevblogYou do not need to cd into your project folder when creating the SSH key.
Step 2: Create an SSH Key
Run this command:
ssh-keygen -t ed25519 -C "anhtran-local-bitbucket" -f ~/.ssh/bitbucket_atdevblog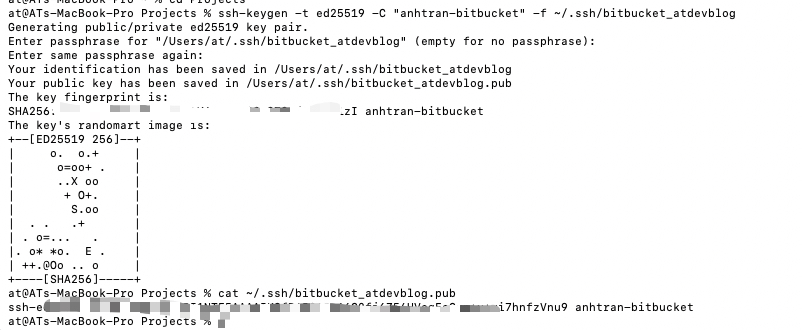
Here is what each part means:
ssh-keygenThis command is used to generate an SSH key.
-t ed25519This selects the Ed25519 key type. It is a modern, short, and commonly recommended SSH key type.
-C "anhtran-local-bitbucket"This is a comment that helps you identify what this key is used for.
You can name it something like:
"anhtran-macbook-bitbucket"or:
"atdevblog-local-bitbucket"-f ~/.ssh/bitbucket_atdevblogThis tells SSH where to save the key file.
In this example, the private key will be:
~/.ssh/bitbucket_atdevblogand the public key will be:
~/.ssh/bitbucket_atdevblog.pubWhen asked for a passphrase:
Enter passphrase (empty for no passphrase):You can enter a passphrase for better security, or leave it empty if you want Git operations to be faster on your personal machine.
If you leave it empty, make sure your MacBook is protected with a strong password, Touch ID, and ideally FileVault.
Step 3: Copy the public key
After creating the key, run:
cat ~/.ssh/bitbucket_atdevblog.pubThe output will look like this:
ssh-ed25519 AAAAC3NzaC1lZDI1NTE5AAAAIxxxxxxxxxxxxxxxx anhtran-local-bitbucket
Copy the entire line.
Important notes:
Only copy the
.pubfile.Do not copy the private key.
Do not send
~/.ssh/bitbucket_atdevblogto anyone.Do not commit your private key to Git.
The public key is safe to add to Bitbucket. The private key must stay on your machine.
Step 4: Add the SSH Key to Bitbucket
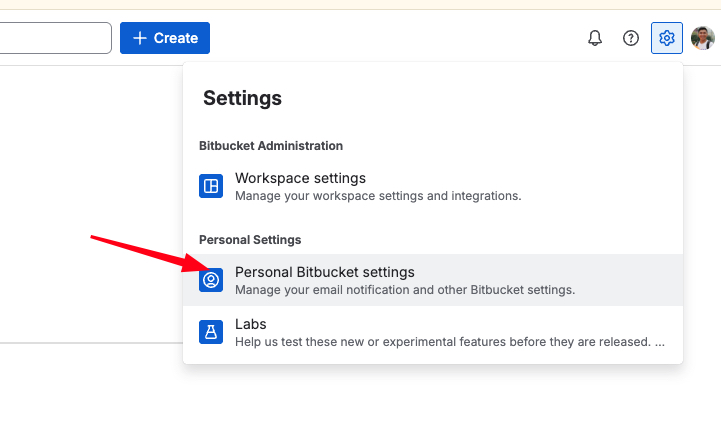
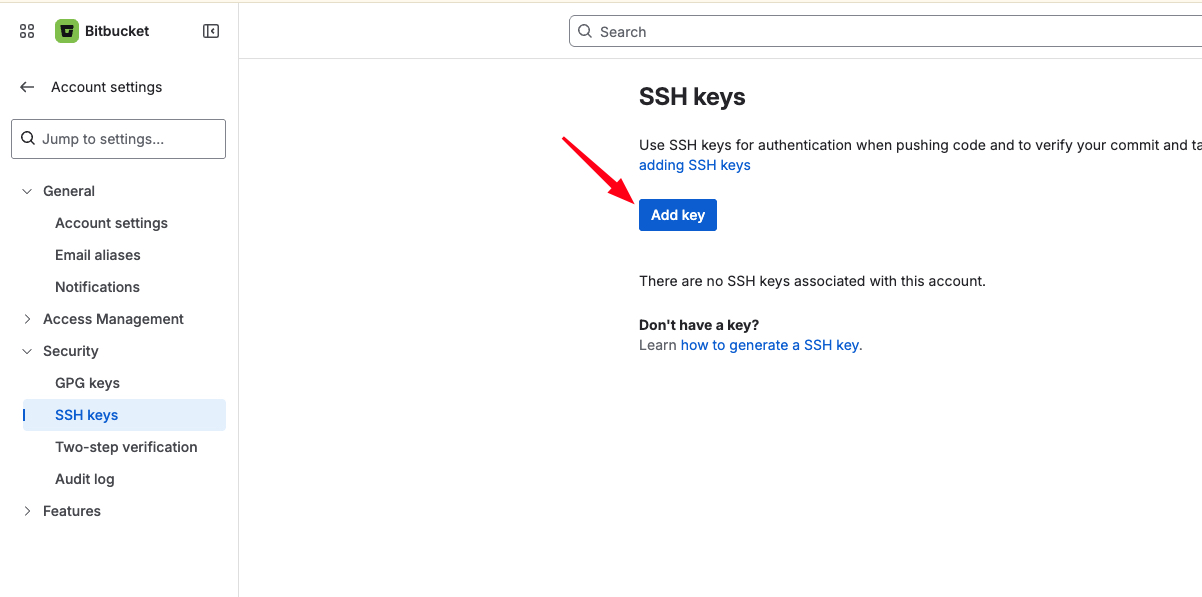
Open Bitbucket in your browser and go to:
Personal Bitbucket settings → Security → SSH keys → Add key
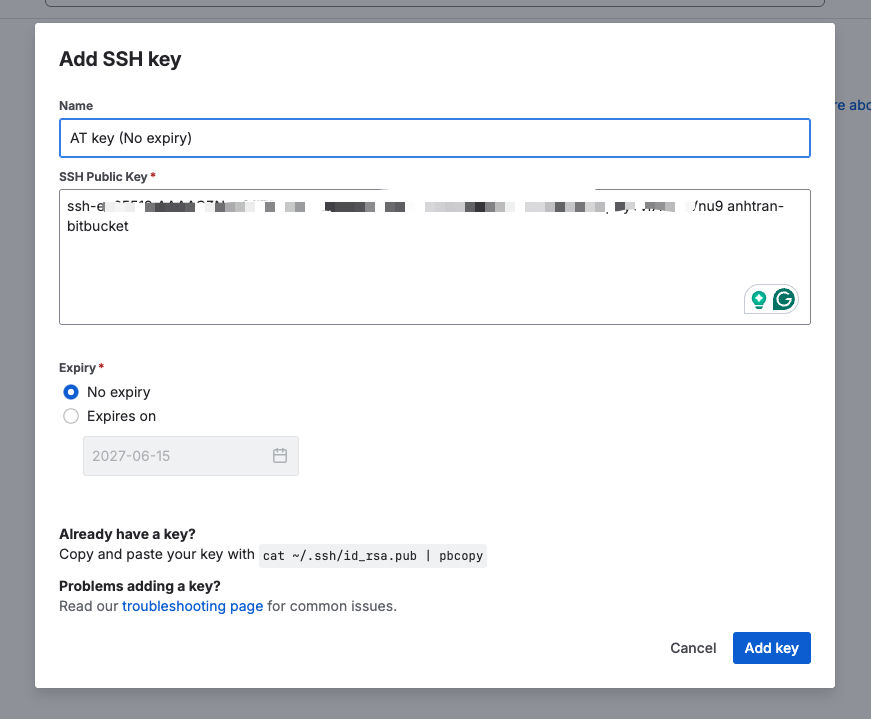
Enter a clear label, for example:
MacBook - atdevblogPaste the public key you copied earlier.
Example:
ssh-ed25519 AAAAC3NzaC1lZDI1NTE5AAAAIxxxxxxxxxxxxxxxx anhtran-local-bitbucketThen click: Add key
Step 5: Create or edit the SSH config file
Next, you need to create an SSH config file so your machine knows which SSH key to use when connecting to Bitbucket.
Run:
nano ~/.ssh/configIf the file does not exist, this command will create it.
If the file already exists, this command will open it for editing.
You can run this command from any folder because ~/.ssh/config belongs to your current user, not to a specific project.
Add this block to the file:
Host bitbucket.org
  HostName bitbucket.org
  User git
  IdentityFile ~/.ssh/bitbucket_atdevblog
  IdentitiesOnly yes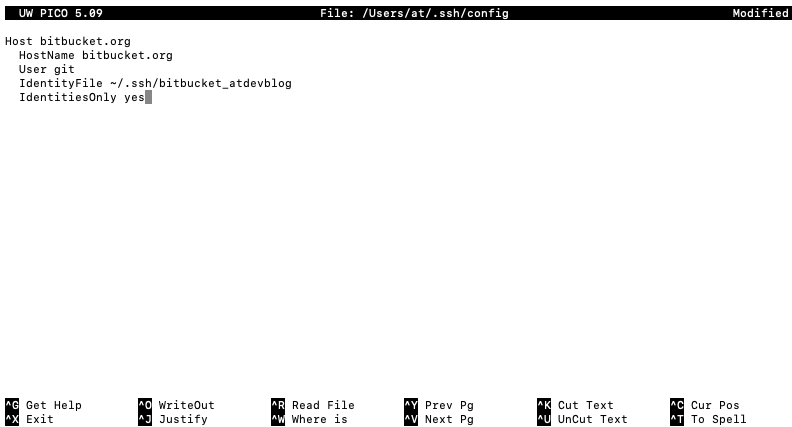
Explanation:
Host bitbucket.orgThis is the host pattern. When Git sees a remote like:
git@bitbucket.org:anhtran/atdevblog.gitSSH will use this configuration block.
HostName bitbucket.orgThis is the real server address that SSH connects to.
User gitThe SSH user for Bitbucket is always git.
This is not your personal Bitbucket username.
IdentityFile ~/.ssh/bitbucket_atdevblogThis tells SSH which private key to use.
In this example, SSH will use:
~/.ssh/bitbucket_atdevblogIdentitiesOnly yesThis tells SSH to use only the key defined in IdentityFile.
It helps avoid problems when your machine has many SSH keys.
To save and exit nano:
Control + O
Enter
Control + X
Step 7: Set correct SSH file permissions
Run:
chmod 700 ~/.ssh
chmod 600 ~/.ssh/bitbucket_atdevblog
chmod 644 ~/.ssh/bitbucket_atdevblog.pub
chmod 600 ~/.ssh/config
This makes sure your SSH files are not too open.
If the private key permission is too open, SSH may refuse to use it.
Step 8: Test SSH connection to Bitbucket
Run:
ssh -T git@bitbucket.orgWhat result means it is working?
If the setup is correct, you may see a message similar to:
authenticated via ssh key.
You can use git to connect to Bitbucket. Shell access is disabled
The message:
Shell access is disabled
is normal.
Bitbucket allows SSH for Git clone, pull, and push. It does not allow you to open a normal Linux shell through SSH.
If you see a successful authentication message, your SSH key setup is working.
4. Change local Git remote from HTTPS to SSH
After your SSH key works, you need to change your project remote from HTTPS to SSH.
Step 1: Go to your local project folder
This command must be run inside your Git project folder.
Example:
cd ~/Projects/atdevblogOr use your real project path:
cd /path/to/your/projectCheck whether you are inside a Git repository:
git statusIf you see something like:
On branch main
you are in the correct project folder.
Step 2: Check the current remote
Run:
git remote -vIf your project is still using HTTPS, you may see:
origin https://bitbucket.org/anhtran/atdevblog.git (fetch)
origin https://bitbucket.org/anhtran/atdevblog.git (push)
Step 3: Change the remote to SSH
Run:
git remote set-url origin git@bitbucket.org:anhtran/atdevblog.gitThen check again:
git remote -vThe correct output should look like this:
origin git@bitbucket.org:anhtran/atdevblog.git (fetch)
origin git@bitbucket.org:anhtran/atdevblog.git (push)
If you see git@bitbucket.org:..., your remote has been changed to SSH successfully.
5. Test git pull and git push
Test git pull
Run:
git pull origin mainIf your local branch is already up to date, you may see:
Already up to date.
If there is new code, Git will show the updated files or commits.
Both results are fine as long as there is no authentication error.
Test git push
If your account has permission to push to the repository, run:
git push origin mainWhat result means it is working?
If there is nothing new to push, you may see:
Everything up-to-date
If you have new commits, you may see something like:
Enumerating objects: ...
Counting objects: ...
Compressing objects: ...
Writing objects: ...
To bitbucket.org:anhtran/atdevblog.git
old_commit..new_commit main -> main
If Git pushes to bitbucket.org:anhtran/atdevblog.git successfully and you no longer see Authentication failed, your SSH setup is working.
6. Is Windows different from macOS?
Yes, but only slightly.
The main flow is the same:
Create SSH key → Add public key to Bitbucket → Create SSH config → Test ssh -T → Change remote to SSH → Test pull/push
The main differences are the terminal, file path, and how you open the SSH config file.
Which terminal should you use on Windows?
You can use:
Git Bash
PowerShell
Windows Terminal
VS Code integrated terminal
If you already installed Git for Windows, Git Bash is usually the easiest option because the commands are very similar to macOS and Linux.
Create SSH key on Windows using Git Bash
Open Git Bash and run:
ssh-keygen -t ed25519 -C "anhtran-windows-bitbucket" -f ~/.ssh/bitbucket_atdevblogIn Git Bash, ~ still points to your user home folder.
It usually maps to:
C:\Users\<YourUser>\.ssh\Example private key path:
C:\Users\AnhTran\.ssh\bitbucket_atdevblogExample public key path:
C:\Users\AnhTran\.ssh\bitbucket_atdevblog.pubCopy the public key:
cat ~/.ssh/bitbucket_atdevblog.pubThen add it to Bitbucket just like on Mac:
Personal Bitbucket settings → Security → SSH keys → Add key
Create SSH config on Windows
If you are using Git Bash, run:
nano ~/.ssh/configIf nano is not available, use Notepad:
notepad ~/.ssh/configOr open this file directly:
C:\Users\<YourUser>\.ssh\configAdd the same content:
Host bitbucket.org
  HostName bitbucket.org
  User git
  IdentityFile ~/.ssh/bitbucket_atdevblog
  IdentitiesOnly yes
The meaning is the same as on macOS:
Host bitbucket.org: configuration for Bitbucket connections.HostName bitbucket.org: the real server to connect to.User git: Bitbucket SSH user isgit.IdentityFile ~/.ssh/bitbucket_atdevblog: the key used for authentication.IdentitiesOnly yes: use only this key.
Test SSH on Windows
In Git Bash, run:
ssh -T git@bitbucket.orgThe successful result is similar to macOS:
authenticated via ssh key.
You can use git to connect to Bitbucket. Shell access is disabled
If this is your first connection, Windows/Git Bash may ask:
Are you sure you want to continue connecting (yes/no/[fingerprint])?
Type:
yesThen run the SSH test again if needed.
Change remote to SSH on Windows
This step is the same as macOS.
You need to be inside your Git project folder.
Example:
cd /c/Users/AnhTran/Projects/atdevblogCheck the current remote:
git remote -vChange the remote:
git remote set-url origin git@bitbucket.org:anhtran/atdevblog.gitTest pull:
git pull origin mainTest push:
git push origin mainKey differences between Windows and macOS
Item | macOS | Windows |
|---|---|---|
Recommended terminal | Terminal | Git Bash or Windows Terminal |
SSH folder |
|
|
Open SSH config |
|
|
Copy public key |
|
|
SSH test command |
| Same as macOS |
SSH remote format |
| Same as macOS |
Common issues | Wrong key permission, wrong config | Git/OpenSSH not installed, wrong terminal, wrong path |
7. Common Bitbucket SSH Key errors
Error 1: Permission denied publickey
Error:
git@bitbucket.org: Permission denied (publickey).
fatal: Could not read from remote repository.
Possible reasons:
You did not add the public key to Bitbucket.
You added the wrong public key.
IdentityFilepoints to the wrong key.Git is using a different SSH key.
Your Bitbucket account does not have access to the repository.
How to check:
ssh -T git@bitbucket.orgIf the SSH test is not successful, do not test git pull or git push yet. Fix SSH first.
Error 2: Remote is still using HTTPS
If you already set up SSH but still get App Password or API Token errors, your remote may still be using HTTPS.
Check:
git remote -vIf you still see:
https://bitbucket.org/anhtran/atdevblog.gitchange it to SSH:
git remote set-url origin git@bitbucket.org:anhtran/atdevblog.gitError 3: Host key verification failed
Error:
Host key verification failed.
fatal: Could not read from remote repository.
Try:
ssh -T git@bitbucket.orgIf the system asks whether you trust the host, type:
yesThen test again:
git pull origin mainError 4: Your machine has multiple SSH keys
If your machine has many SSH keys, SSH may use the wrong one.
The fix is to clearly define the Bitbucket key inside:
~/.ssh/configUse:
Host bitbucket.org
  HostName bitbucket.org
  User git
  IdentityFile ~/.ssh/bitbucket_atdevblog
  IdentitiesOnly yes
If it still fails, run:
ssh -vT git@bitbucket.orgThis command helps you see which key SSH is trying to use.
Error 5: Push is denied even though SSH test works
If this command works:
ssh -T git@bitbucket.orgbut this command fails:
git push origin mainyour account or SSH key may only have read permission.
Possible fixes:
Check your permission in the repository.
Check whether you have write access to the repository.
Check whether the
mainbranch has branch restrictions.Try pushing to another branch if direct push to
mainis blocked.
8. Quick checklist after setup
Check that the SSH key exists:
ls -la ~/.sshCheck SSH config:
cat ~/.ssh/configTest SSH:
ssh -T git@bitbucket.orgIt is OK if you see successful SSH key authentication.
Check remote:
git remote -vThe remote is correct if you see:
git@bitbucket.org:anhtran/atdevblog.gitTest pull:
git pull origin mainIt is OK if there is no authentication error.
Test push:
git push origin mainIt is OK if you see Everything up-to-date or the commit is pushed successfully.
9. Should you use SSH Key or API Token?
Situation | Recommended option |
|---|---|
Personal machine used for daily push/pull | SSH Key |
Quick HTTPS fix on local machine | API Token |
Git or Sourcetree does not ask for password | Temporarily put API Token in remote URL |
Long-term deployment server | SSH Key or Repository Access Token |
CI/CD pipeline | Repository Access Token or CI/CD Secret |
Only need to pull code | Read-only access |
Need to push code | Write access required |
If you have successfully set up SSH Key on your MacBook, it is a very good option for your personal development environment.
For staging or production servers, avoid copying your local private key to the server if possible. It is better to create a separate SSH key directly on the server or use a Repository Access Token for deployment.
10. Conclusion
When Bitbucket App Password is deprecated, Git commands over HTTPS such as:
git pull
git clone
git push
may fail with authentication errors.
There are several ways to fix the issue, but if you use a personal machine for daily development, setting up an SSH Key is a clean, stable, and easy-to-maintain solution.
The standard MacBook flow is:
ssh-keygen -t ed25519 -C "anhtran-local-bitbucket" -f ~/.ssh/bitbucket_atdevblog
cat ~/.ssh/bitbucket_atdevblog.pub
nano ~/.ssh/config
ssh -T git@bitbucket.org
git remote set-url origin git@bitbucket.org:anhtran/atdevblog.git
git pull origin main
git push origin main
The standard Windows flow using Git Bash is:
mkdir -p ~/.ssh
ssh-keygen -t ed25519 -C "anhtran-windows-bitbucket" -f ~/.ssh/bitbucket_atdevblog
cat ~/.ssh/bitbucket_atdevblog.pub
notepad ~/.ssh/config
ssh -T git@bitbucket.org
git remote set-url origin git@bitbucket.org:anhtran/atdevblog.git
git pull origin main
git push origin main
Key points to remember:
Create the SSH key on your local machine if you want to push and pull from your local machine.
Create the SSH key on the server if the server needs to run
git pullfor deployment.Do not share your private key.
Do not commit your private key to Git.
The correct SSH remote format is:
git@bitbucket.org:anhtran/atdevblog.gitIf ssh -T git@bitbucket.org works and git remote -v shows the SSH remote, you can push and pull code without using App Password or API Token in the remote URL.
CTA
If you are seeing App passwords are deprecated, Authentication failed, or error 410 when using Bitbucket, check your Git remote first. If you work from a personal development machine, consider switching to SSH Key for a cleaner, safer, and more stable push/pull workflow.